Thursday 23 August 2012

Untraditional Cottage Pie

Cottage pie is normally made from mince beef, carrots, onions, beef stock, potatoes, thyme, worcestershire sauce and tomato puree. I've used this as a basis for this recipe but just added some extra ingredients here and there and came up with this delicious Three2Tea version:


Ingredients:

  • 500-750g Minced Beef
  • 4 Medium Sized carrots
  • 4 Small Onions
  • 2 fresh beetroots
  • One Tomato
  • 2 Medium sized mushrooms
  • 2 Cloves Garlic
  • Potatoes - roughly 300g
  • Handful of fresh basil leaves
  • Roquefort cheese
  • 2 tbsp Worcestershire sauce
  • 2 tbsp Tomato sauce
  • 400ml Chicken stock
  • A pinch of cayenne pepper
  • Salt and pepper to taste
  • Butter and milk for mash
Directions:

  1. Dice up your vegetables, fry the beetroot, onions, carrots and garlic in some oil until onions have softened.
  2. Add in the mince beef and fry until mince is nearly fully browned.
  3. Add the chicken stock in, along with the cayenne pepper, tomato sauce, worcestershire sauce, tomato and mushrooms.
  4. Simmer on low heat for 40 minutes.
  5. Boil the potatoes in a separate pot until done. Mash with milk and butter (add enough of each to get the consistency you like)
  6. Preheat oven to 180 degrees celsius.
  7. After 40 minutes, season minced beef and vegetables to taste, pour this into a oven proof dish and spoon the mash on top of it.
  8. Sprinkle basil and cheese on top of the mash.
  9. Bake in oven for 20 minutes or until lightly brown on top.
Simple right? This will feed 4 small stomachs or two very hungry stomachs!
That's it!

Satsuma-imo.

Tuesday 21 August 2012

Our Homegrown Vegetables!

I just wanted to share some pictures with you of some vegetables that we are growing. We are not the best gardeners, in fact we are total newbies, we just plant the seeds, water them and hope that they grow! Our potato harvest was good, although we had quite a few rotten ones, we blame the heavy rain! I love all the bright coloured ones, the purple one is my fave!


These were not as big as we thought they were going to be, but a good harvest none the less. Don't ask me what variety these are since I can't remember!

Next some purple celery!

Looks amazing to me, I wonder how they taste??


The tomatoes are growing! I'm super excited about these, they look a good size as well!


Here are some Cox apples as well, not my fave apple but still it's grown on our garden!

All these are organic, which makes us even more proud!

Satsuma-imo.

Tuesday 14 August 2012

Banana and Hazelnut Whoopie Pies

Wow it's been a while since I posted anything on here, sorry Aubergine! :P

Today I will share this recipe on how to make super yummy banana and hazelnut whoopie pies! There's no better way to use up those over ripened bananas! One lot is filled with nutella and the other with peanut butter.


Ingredients:

  • 2 cups of plain flour 
  • 1/2 teaspoon bicarbonate of soda
  • 1/2 teaspoon baking powder
  • 1/2 teaspoon salt
  • 2/3 cup of sugar
  • 1/3 cup light brown muscovado sugar
  • 4 oz butter
  • 2 bananas
  • 1/2 cup buttermilk
  • 1 egg
  • 1 teaspoon vanilla extract
Directions:

  1. Preheat oven to 180 degrees celsius.
  2. Sift flour and add in bicarbonate of soda, baking powder and salt.
  3. Mash bananas in a separate bowl and mix in the buttermilk. Leave to one side.
  4. Cream together the butter and both sugars until light and fluffy. Add in vanilla extract and egg and mix.
  5. Add in 1/3 of flour and mix. Add 1/3 of banana and buttermilk mixture and mix. Keep alternating flour and banana mix until all incorporated.
  6. Spoon 1 tablespoon of mixture onto baking trays. Space them about 1-1.5 inches apart.
  7. Bake for 10-12 minutes and golden brown. Set aside to cool.
  8. Spread nutella or peanut butter and sandwich together.
What's your favourite whoopie pie flavour?

Satsuma-imo.

Monday 13 August 2012

Dorayaki

Like most people, I discovered dorayaki through an anime called Doraemon. The main character, of the same name, is a robotic cat who can pull out endless gadgets from his kangaroo-like pouch. The anime follows his adventures with a nerdy schoolboy named Nobita, who Doraemon is staying with. It's definitely one of my favourite childhood cartoons.

Anyone who is a fan of the anime will know that Doraemon's favourite food is dorayaki, which is essentially two honey flavoured pancakes sandwiched with red bean paste. There is a famous HK chain that sells mini dorayaki, which are equally tasty as they are pricey. In my spare time I like nothing better than reading recipe books, looking at food websites and watching people make food online. I discovered this video of someone making dorayaki and they look like exactly as they should...perfectly brown and perfectly round. I was particularly impressed at time 7:50, which all of you should try!


My Japanese is very substandard but luckily I can make out the ingredients. I had to westernise my dorayaki as I didn't have any red beans to make my own red bean paste. Peanut butter, my homemade lemon and lime curd from last week and some hazelnut and chocolate spread were, however, good substitutes!

Ingredients

200g sugar
3g bicarbonate of soda
20g honey
2 eggs
240g plain flour
160ml water

I won't write down a method for this. As they say, a picture (or video in this case) is worth a thousand words.

These are how mine turned out.


And my fave: peanut butter!


- Aubergine

Sunday 5 August 2012

Lemon & Lime Curd

We have a bad habit of buying food and then forgetting about it for weeks, months and even years! On our rare cupboard/fridge clearouts we've uncovered unopened bags of flour that have past their sell by date by 2 years! Even with what I consider a stomach of steel, I still wouldn't dare attempt to make and eat something with 2yr old flour.

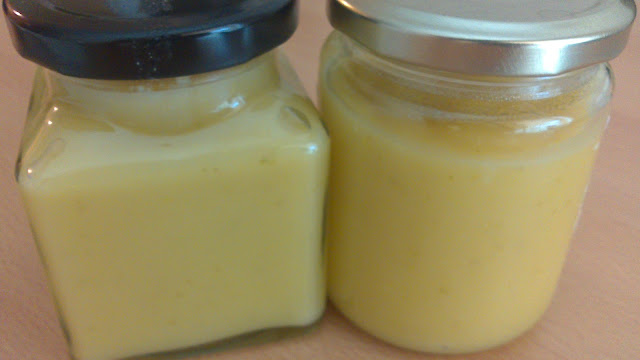
Rest assured the recipe I have for you today is not made from gone-off ingredients! Thanks to our swanky new fridge perishable items have become less perishable and the lemons and limes that we bought a couple of weeks ago are still looking pretty fresh.  They are the stars of this recipe: Lemon & Lime Curd.


I don't like things that are overly sweet so this recipe has slightly less sugar than other recipes you might find.

Ingredients
2 lemons, zested and juiced
2 limes, zested and juiced
165g caster sugar
95g butter
3 eggs + 1 egg yolk, beaten

Method
  1. Place the zest and juice of the lemons and limes in heatproof bowl together with the butter and the sugar.
  2. Place over a pan of simmering water and wait for the butter and sugar to melt, stirring occasionally.
  3. Slowly pour the beaten egg into the butter and sugar mixture and whisk until thickened. This should take about 10mins.
  4. While still hot, pour the curd in two sterilised medium jars and seal immediately.
  5. Leave to cool before eating.
I tasted the curd whilst it was still warm and I still found it too sweet but hopefully once it has cooled the sweetness will mellow down a little. I'm tempted to use the curd as either a doughnut or scone filling so there may be related post coming up soon...

- Aubergine